 |
The Georgia Mineral Society, Inc. 4138 Steve Reynolds Boulevard Norcross, GA 30093-3059 |
MAKING 3D PHOTOMICROGRAPHS
by
Dave Babulski, Ed.D.
("Tips and Trips", Volume XXXV/Six, June 2006, Pages 13-14)

I have been interested in 3D imaging for quite a long time and recently have begun experimenting with 3D imaging through the microscope. A growing area of experimentation on the part of 3D imaging hobbyists is creating 3D images form the microscope. There is abundant information about 3D imaging and 3D photography on the internet. I would suggest that you look at some of these interesting web sites before experimenting on your own. (A number of these web sites are listed at the end of this special report.)
A stereo microscope yields two images separated by the distance between our two eyes. Through the stereo microscope each eye sees a slightly different view of the specimen. When these two slightly shifted images are combined in the brain the sensation of a 3D image is created. The goal of 3D photomicrographs is to create the illusion of a 3D image without using the stereo microscope.
After much experimentation, I have found a relatively easy way to create 3D photomicrographs of mineral micromounts. The technique I use employs the Babulski gimbal mechanical stage with the microscope used to take the photomicrographs. The gimbal stage makes the task of positioning the specimen for 3D imaging very easy.
The idea behind 3D imaging is to create two images shifted in position, as each of our two eyes would see them through the stereomicroscope. To see the 3D effect, these two photographic images are placed next to each other and held at reading distance (About arms length). Looking at the junction between the two images you cross your eyes and then let your eyes relax (This takes a little practice so be patient). You will see a third image appear between the two photographs, this third image will appear in 3D!
To create a 3D photomicrograph using the Babulski gimbal stage, you first center the specimen and note the position of the inner gimbal ring. Then you rotate the inner gimbal ring 2.5 degrees to the right and make a photographic exposure. Note that this is the “Right Side” image. Then rotate the inner gimbal ring 5 degrees to the left and make another photographic exposure. Note that is is the “Left Side” image. Using the gimbal stage makes the process very easy.
A number of major factors must be kept in mind when creating 3D photomicrographs. These major factors are:
- The linear alignment of the two images is critical. Care must be taken to move the stage or the microscope in linear X or Y directions to keep the specimen in the correct orientation between the two photographic exposures.
- Lighting between the two exposures must be as close to the same as possible. This can be a bit tricky particularly if the specimen position was moved both in the linear and gimbal rotation directions.
- Focus must also be the same between the two exposures. I have found that selecting several key areas of the specimen as focus markers helps maintain overall image focus between the two exposures.
- It is critical to note which exposure is image “right” which is image “left”. When viewing the two images to create the 3D effect, the left image must be on the left and the right on the right side. If the images are reversed, the 3D effect will not appear.
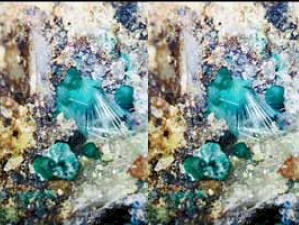
Figure 1: Stereo Image pair of Mixite with Malachite and Azurite
from the Carisso Mine, Tintic District, Utah.
Figure 2 shown below is a stereo pair of Vanadinite taken through the microscope with the Babulski gimbal stage technique. The images are four second exposures on Kodak ASA 400 color print film at a magnification of 25X.

Figure 2: Stereo Image pair of Vanadinite
from the Ford Mine, Tucson Wash, Pinal County, Arizona
Having the ability to view 3D images of some favorite mineral micromounts without the stereo microscope offers another way to enjoy mineral micromounting.
Internet References:
www.mineralarts.com/stereo/micro.html
www.ray3d.com
www.3d-web.com
www.3d2di4.com
For more information on the Babulski Gimbal Mechanical Microscope Stage, see Rocks and Minerals magazine (73:06), Nov./Dec., 1998

Copyright © Georgia Mineral Society, Inc.