 |
The Georgia Mineral Society, Inc. 4138 Steve Reynolds Boulevard Norcross, GA 30093-3059 |
Care and Feeding of Crystals Begins in the Field
by
Julian Gray, P.G.
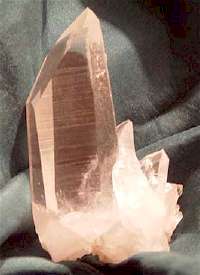
Quartz Crystals
(photo courtesy of Bill Waggener)
CRUNCH! Sound familiar? You’re at your favorite quartz crystal location digging away and with the next push of the shovel blade you hear a familiar and sickening sound like biting into a Rice-Krispy snack bar. The good news: you found the pocket. The bad news: you’ve ruined one or several crystals. But oh well, there are still dozens of crystals. So you happily dig away, flinging crystal after crystal into your bucket to take them home. Once cleaned, you find yourself saying “this would have been a good crystal if that termination didn’t have that chip.” If this all sounds familiar, then here are a few ideas to help you out.
I want to emphasize a few things here at the start. Most of us have fine crystals at home – perhaps even many that are museum quality. These minerals are the product or rare geologic circumstance and can be quite beautiful and valuable – which is why we collect them in the first place. They also have sat in the ground for perhaps millions of years. The scientific and aesthetic value of some specimens is immense. Now some yahoo (like me) comes along and starts flailing away at a rock with a sixteen pounds sledge hammer. Stop and think about what you are doing. While digging rocks sounds trivial, a little thought might help to avoid wounding crystals at the point of collection. I’ve raised this to a high level of nerdiness, but the rewards are worth me embarrassing myself if it improves the quality of material that we bring home.
Digging to remove lots of overburden and expose crystals is unavoidable and the risk of damaging specimens is great during this phase of collecting while picks and shovels are flying. It’s easy to get caught up in the excitement of the moment and start working quickly to expose more, but this is exactly the time when you need to slow down. Along with my heavy tools, I carry a whisk brush or small brush. At the first promising sign, I stop digging and clear away the loose debris. This helps me find the pocket, if that is indeed what I’ve found. It also helps me plan what tool to use next and where to work. I generally have three choices at this point: (1) False alarm, keep digging (most of my trips are like this), (2) There are crystals exposed, but I need to move nearby rocks to expose more of the pocket, and (3) Wahoo! Crystal faces are exposed and ready to be removed. Option (1), keep digging is easy. With option (2), I switch tools and carefully remove the obstructions to the pocket. I view this as working a puzzle in reverse; the pieces went together in a certain way and I have to figure out how to get them out. This usually involves various prying tools. I typically use an Estwing gad bar, which is a giant chisel with a tiny pick on one end. It can be used as a lightweight hammer or as a chisel and then lever once firmly hammered in the crack. The tiny pick on the other end can be used for great mechanical advantage to pry cracks open. I also use screwdrivers, including one that with an intentionally bent tip. I made this item by heating the tip in a torch flame and bending the tip in a vise. Auto parts stores carry brake tools that are like giant screwdrivers with bent tips. These high strength steel tools make excellent pry bars. Chiseling and hammering may be necessary, but do this wisely. Most of the shock of the hammer blow is transferred to adjacent rocks and can loosen crystals from the matrix. Repeated hammering should be avoided. A single large hammer strike is favorable. Given a choice, I’d take the force of a single small explosive charge over twenty hammer strikes. And now that you have freed the boulder, you have to finesse a seventy-five pound rock out of a hole and out of the way. Make a friend. Since you have crystals showing, offer to share in exchange for help lugging boulders out of the hole. Then take a water break, now you’ve exposed the pocket and have some delicate work ahead.
Step (3) is to remove the crystals. At this point, I typically use a variety of small tools, some made of plastic. Remember Moh’s’ scale of harness? Which is harder, plastic or quartz? (Plastic – H = 2 – 2.5, and yes I tested it. Actually, my # 2 hardness point is plastic.) I’m even thinking of experimenting with homemade oak tools. Seriously. Also, if your cheap plastic tool breaks – rejoice! Better a ninety-nine cent putty knife that a $75 amethyst crystal. I frequently use plastic putty knives or the handle of a tooth brush. If I am using the tooth brush handle then I can switch to the brush end periodically to wipe out loose material. Stop frequently to touch the crystal. I collect by feel. Touch the crystal and try to move it. If you hear that rice krispy crunch sound, slow down. Carefully remove clay or soil from around the crystal. Try to excavate under the crystal forming a void below the crystal. Again, do this using plastic tools or dental tools. In some cases, once enough soil has been removed from around the crystal, it will simply come off in your hand. In some cases, it must be pried from the matrix. Use small tools and small movement – you don’t want to spend hours to get to this point to have the crystal fling out in an uncontrolled manner. Cradle the piece with your free hand. Don’t have a free hand? Put some packing material around the crystal to protect the tip. Ideally there should be a final crunch or snap, but this time only matrix because of your careful collecting. Put the tools down, turn the piece over. Wow! “This will clean up nicely” you say to yourself.
Now you throw it in the bucket right? Wrong! Now that you have the crystal in hand, you now have the responsibility of caring for it. I take this as seriously as if I were adopting a stray pet. You wouldn’t throw a pet in the truck and forget about it. Carefully pack the crystal and place it in a rigid container. Buckets are fine, but once extracted from the ground, the crystals should not touch other crystals, doing so risk chipping. High end mineral buyers and picky collectors look carefully at the tips and edge of crystals. Dings and chips there reduce the aesthetic value of the specimen. These dings and chips are produced by crystals bumping together. Wrap the crystals in the field – packing material is cheap. I use various things for packing; newspaper (cheap, but newsprint can stain rock matrix), paper towels (a buck or so a roll), dry cleaner bags (acid free!), bubble wrap, toilet paper. I have also started to use Ziploc plastic bags of various sizes. These don’t provide minimal protection, but it may be enough for some cases.
I’m certain I’ve made my point that care of mineral specimens begins at the point of collection. I’ll leave the cleaning part to others. But I do have one other point to make – documentation. No other fact about a specimen is more important than where it came from. If you misidentify the mineral, that can be corrected. If you forget where a specimen came from, that is not forgivable. While the specimen beauty remains, its usefulness as a specimen is nearly completely lost. I label specimens at the point of collection! At home, I cut 3 by 5 index cards into small strips. One reason I’m using Ziploc bags now is that I can throw the label in with the specimen and keep them together. In the field, I write three things on the label with a permanent marker (sharpie, for instance): mineral name, date collected, and mine name. All are important. Certain parts of a mine or quarry may be exposed only at a single point in time. Knowing when a specimen was collected can provide valuable information about a deposit. When possible I note where in a mine the specimen was collected: northwest corner of main pit, for example. I have seen only two specimens of gold from Graves Mountain, but no one can tell me where they were collected. How valuable would that information be now! I’ve also found that a notebook is useful. Sometimes the only thing I write is the date, place, and who I am collecting with. But this is often enough to reconstruct when I collected something.
Good luck!
Julian’s Recommended Collecting Tools:
- Notebook and LABELLING SUPPLIES (precut index cards and sharpie)
- Estwing Geo/Paleo Pick
- Shovel – I have a lightweight backpacking shovel about 2 ft long
- Hammer – I now carry only one, a combination crack hammer and chisel point pick. I think they are sold as engineers hammers or lineman’s hammers
- Estwing gad bar – The most essential tool in my pack
- Assorted chisels – One inch to one-quarter inch Whisk broom
- Plastic spackling blade
- Large screwdriver
- Large screwdriver with curve tip – Buy a screwdriver, heat the tip with a torch and bend it in a vise.
- Brake tools – Yes car brake tools. They are available from auto parts stores or Northern tools. These are like giant screwdrivers with bent blades for prying cracks in rock. They are made from hardened steel and come in assorted sizes.
- Dental tools – Every time I go to the dentists, I ask for their broken tools. I have mine trained to save them for me.
- Tooth brush
- Gloves, goggles, and hard hat
- Packing material and containers
- Lunch

Copyright © Georgia Mineral Society, Inc.