 |
The Georgia Mineral Society, Inc. 4138 Steve Reynolds Boulevard Norcross, GA 30093-3059 |
How to Clean Quartz
by
Charles Carter
How do you know that the chemical you are about to use is safe or dangerous? How do you find out what safety precautions you need to take when using this chemical? If you know the name of the chemical compound that you are using, search the internet for the "Material Safety Data Sheet" or MSDS. The MSDS will explain the potential hazards of the chemical as well as safety precautions and proper use.
Oxalic acid is highly poisonous and can be absorbed through the skin. Also, using HOT oxalic acid leads to fumes which can be breathed in, not to mention one should not use the container again for anything BUT this purpose.
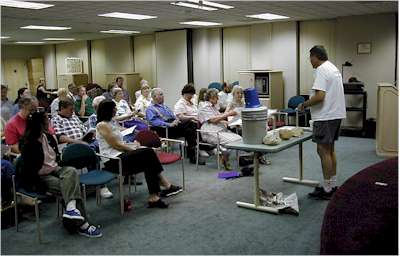
The following is put together from several sources and is by no means complete, but it seems to work for me. Cleaning in this context means prepping a specimen for display. Before you start, have a goal in mind of what clean means. A specimen is almost never perfectly clean and if you attempt to get it perfectly clean you may harm it. So how clean is clean? For some people it isn’t clean until every speck and stain is removed. For others, some dirt and/or stain may help accentuate a specimen with some degree of contrast. So, the answer to the question is that there is no single answer. It is an aesthetic problem and only the person evaluating the cleaning results can make the decision. You can stop cleaning a specimen at any point in the process described below. You can even skip steps.
There are two main areas of cleaning. The first is mechanical, which involves removing what is not the specimen by physical means. The second is chemical, which involves dissolving what is not wanted and so removing it.
There are many ways to clean a specimen via mechanical cleaning. Shaking a specimen may remove some debris. Washing with a strong stream of water will clean some. Also a dental pick can be used to remove pebbles and other pieces as needed. One way to remove clay is to wet the clay and allow the specimen to dry. This will expand and contract the clay and so cause it to crumble and then be removed. This wet/dry process may need to be done many times.
To clean a specimen chemically, one needs a chemical that will not harm the specimen but will help remove what is not wanted on the specimen. The chemicals talked about in this article are bleach, SHMP, and oxalic acid. There are many others that may be useful.
The best results come from a combination of mechanical and chemical cleaning. Following are the steps that cover the most common cases of cleaning quartz.
Safety First
Please follow the following safety rules:
- Keep all cleaning supplies away from children and pets whether you are actively cleaning or just storing the supplies.
- Remember the rule – acid to water, not vice versa. Think alphabetical order.
- Always use sturdy rubber or neoprene gloves. Even if the acid seems not to hurt your skin it may be causing damage and will cause damage given enough exposure.
- Clean outside – never inside – as even mild acids can produce toxic fumes. So even outside, make sure there is good ventilation.
- Never, ever, ever mix chemicals. Always make sure chemicals are neutralized before moving to the next step or declaring the cleaning complete.
- Dispose of used supplies properly. See the cleaning steps below for specifics.
- Make sure the specimen to be cleaned is quartz; otherwise, you may ruin it. If you are not sure, ask someone else. A common mistake is trying to clean quartz that also has calcite, which requires special care.
- Use water to wash off loose dirt. Soap may do some good but will generally not help as it is used to get rid of oils and fats which are not normally on quartz. A fast stream from a hose works well but is a little messy. A small strong water spray works well too. Also, now is the time to trim specimens if needed.
- If the quartz was collected in an area that has organics, such as in a wooded area or in a creek, place the specimen in bleach (used to wash white clothes) and let dry until the bleach smell is gone. This is to kill and get rid of the organics because they will cause problems later if they are left. Bleach does very well for algae and moss.
- If the specimen has clay, one simple way to get rid of the clay is to use wet and dry cycles. What is going on is that clay will expand when wet and contract when dry. This will cause the clay to crack and fall off slowly. Make sure crystals are pointing down when drying to allow the clay to come off. This is a very slow way of cleaning quartz, from days to months, even years. However, this is one of lowest risk, cheapest methods you can use.
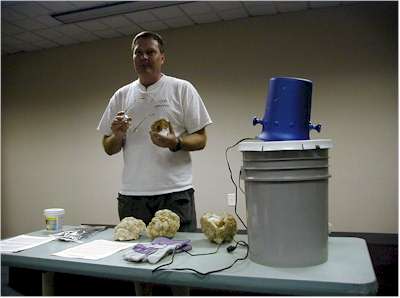
- SHMP (sodium hexametaphosphate) pronounced “shemp”. SHMP is a detergent used to help get clay out. It causes the clay to be suspended in the water and thus not on the specimen. SHMP dissolves slowly in water and so should be made a day ahead of time for use. Place 1 teaspoon of SHMP per 4 gallons of water (a little goes a long way). Once the SHMP is dissolved, place the specimen in and wait a day or two. Once the solution is very muddy, dispose of the used SHMP and start again until the specimen doesn’t have clay on it. (See the “bubbler” description below for how to make this a better and faster process.) Dispose of the SHMP by putting it in your yard where you don’t have any plants and it can’t run off into natural waterways or drainage systems.
- Oxalic acid (wood bleach). This will remove iron oxide (red stains), hematite (some black stains), calcite, other metallic stains, and clay (if you have not already removed the clay by another method). Oxalic acid can be neutralized by either lime (used to treat your lawn) or baking soda. There are at least 2 ways to use oxalic acid:
- If you are in a hurry, make a solution of oxalic acid and water in a non-metallic vessel that can be heated e.g. a glass or ceramic pot such as a crock pot that will never be used for food afterward. Use about 2 tablespoons of oxalic acid to ½ gallon of water. The reason that not much is said about the amount of oxalic acid to use is that it depends a lot on the specimen to be cleaned. If too much oxalic acid is used then the specimen may turn yellow. (More about that later.) It is best if too little is used and then the amount increased until the stain is removed. Add your specimen to the solution and heat until just below a light boil (or less than 180° F). Check at 10 to 30 minute intervals until the stain is gone or more oxalic acid is needed. This is about 4 hours or so. Once the specimen appears to be clean or has turned gray, then let the solution cool. Remove the specimen and place it in a bucket where you can use a hose to spray it clean. Mainly what you are trying to do at this point is remove the gray film that is left behind by the oxalic acid. Keep washing until the water runs clear. If there is an internal pocket in the specimen you will find out about it at this point as it will take a lot to get the water to run clear, so it may be time to consider breaking the specimen to get to the vug for further cleaning. Once the water runs clear, let the specimen dry and see how it looks. If it is clean enough then stop. If not, add more oxalic acid or repeat this step with clean solution.
- If you are not in a hurry, make the solution as above in a 5 gallon bucket and place the specimen into the solution. Place the bucket in the sun when the temperature outside is 70° F or above. You can place a black plastic bag or lid on top to help make it hotter and keep debris out. Check specimens at least once a day until stains are gone or turn gray and are removed. (You can also make the cleaning process better and faster by using a device called a “bubbler” which is described below.) Most specimens are cleaned in 3 to 7 days.
- If at this point the specimen has had too much oxalic and has turned yellow, here are a couple of things to try.
- Reclean the specimen with SHMP.
- Place the specimen in water and let it soak. After one week or more, check and see if the yellow has faded out. If not, keep soaking. This process may take weeks or months, but can be very effective.
- You can also try a wash with muriatic acid. Place the specimen into a 5 gallon bucket and pour muriatic acid over it until it is covered. Let the specimen soak for 30 minutes to an hour. If you see any progress, continue soaking and check again in 30 minutes to an hour. Continue this process until the yellow is gone or you give up. As always, make sure you clean the muriatic acid off before continuing, as mixing acids may be dangerous. Baking soda can be used to neutralize the acid. In addition to removing yellow stains, muriatic can be used for mild cleaning of quartz instead of other methods, particularly if the specimen includes calcite because it will do a great job removing the calcite, though I have not had much success with muriatic in general.
- If you are still not happy with the cleaning, keep in mind the stains in and under quartz points cannot be cleaned. If the specimen is still not as clean as you want it, then it is probably a hopeless case for you, but someone else might like the piece.
- To make crystals sparkle more, dip the specimen in vinegar then rinse with water. Arrange the specimen so the crystals are facing down and let them dry. This is so any residual minerals do not deposit onto the crystals.
How SHMP (Sodium Hexametaphosphate) works
How Oxalic Works
Bubbler
- Drill holes into the bottom of a 5 gallon bucket on one side only.
- On the other side, cut a flap so that a water pump will just fit.
- Place the pump into the opening so the side that draws water in is sticking out of the bottom, the side that blows water out is inside the bucket, and the cord runs up and out of the bucket.
- Place the pump bucket inside another 5 gallon bucket that is the same size as the pump bucket. There should be a gap between the bottoms of the two buckets.
Some other uses of the bubbler are to help in the first wash by allowing the specimens in the top to be cleaned while removing the dirt to the bottom. To do this place the specimens in the top part of the bubbler, add water to cover and then move the bucket back and forth. Kinda like a washing machine. When the water is too dirty or the bottom has too much dirt, empty and repeat until clean enough for the next step.
Good Luck with your quartz cleaning.
Charles Carter
Copyright © Georgia Mineral Society, Inc.